Home > Cases studies > Martensite
Martensite
How can martensite-induced material degradation in stainless steel be detected simply and non-destructively?
Hydrogen is a key solution for energy storage and transport, provided that the materials used remain reliable over time.
Hydrogen is a promising solution for energy storage and transport, particularly effective when combined with intermittent renewable energies for high-energy-consumption applications such as heavy industry and maritime transport. Effective storage and transport are key to integrating hydrogen into the future energy system. Austenitic stainless steel is commonly employed in hydrogen infrastructure. Nevertheless, prolonged use for hydrogen storage can still degrade its performance: Pressure-temperature cycles lead to the transformation of austenite into martensite, a harder and more brittle phase which promotes hydrogen diffusion. The formation of martensite leads to the embrittlement of hydrogen storage and transport facilities, and ultimately to continuous hydrogen leakage.
Conventional methods for detecting martensite in stainless steel include techniques such as X-ray diffraction (XRD), and optical microscopy after chemical etching. While effective, these approaches are often destructive, time-consuming and complex. Since martensite tends to form localized clusters and exhibits ferromagnetic properties, we explored the possibility of detecting it through NV-based measurements of magnetic leakage fields at the material’s surface, in collaboration with the CETIM and ELyTMaX laboratories.

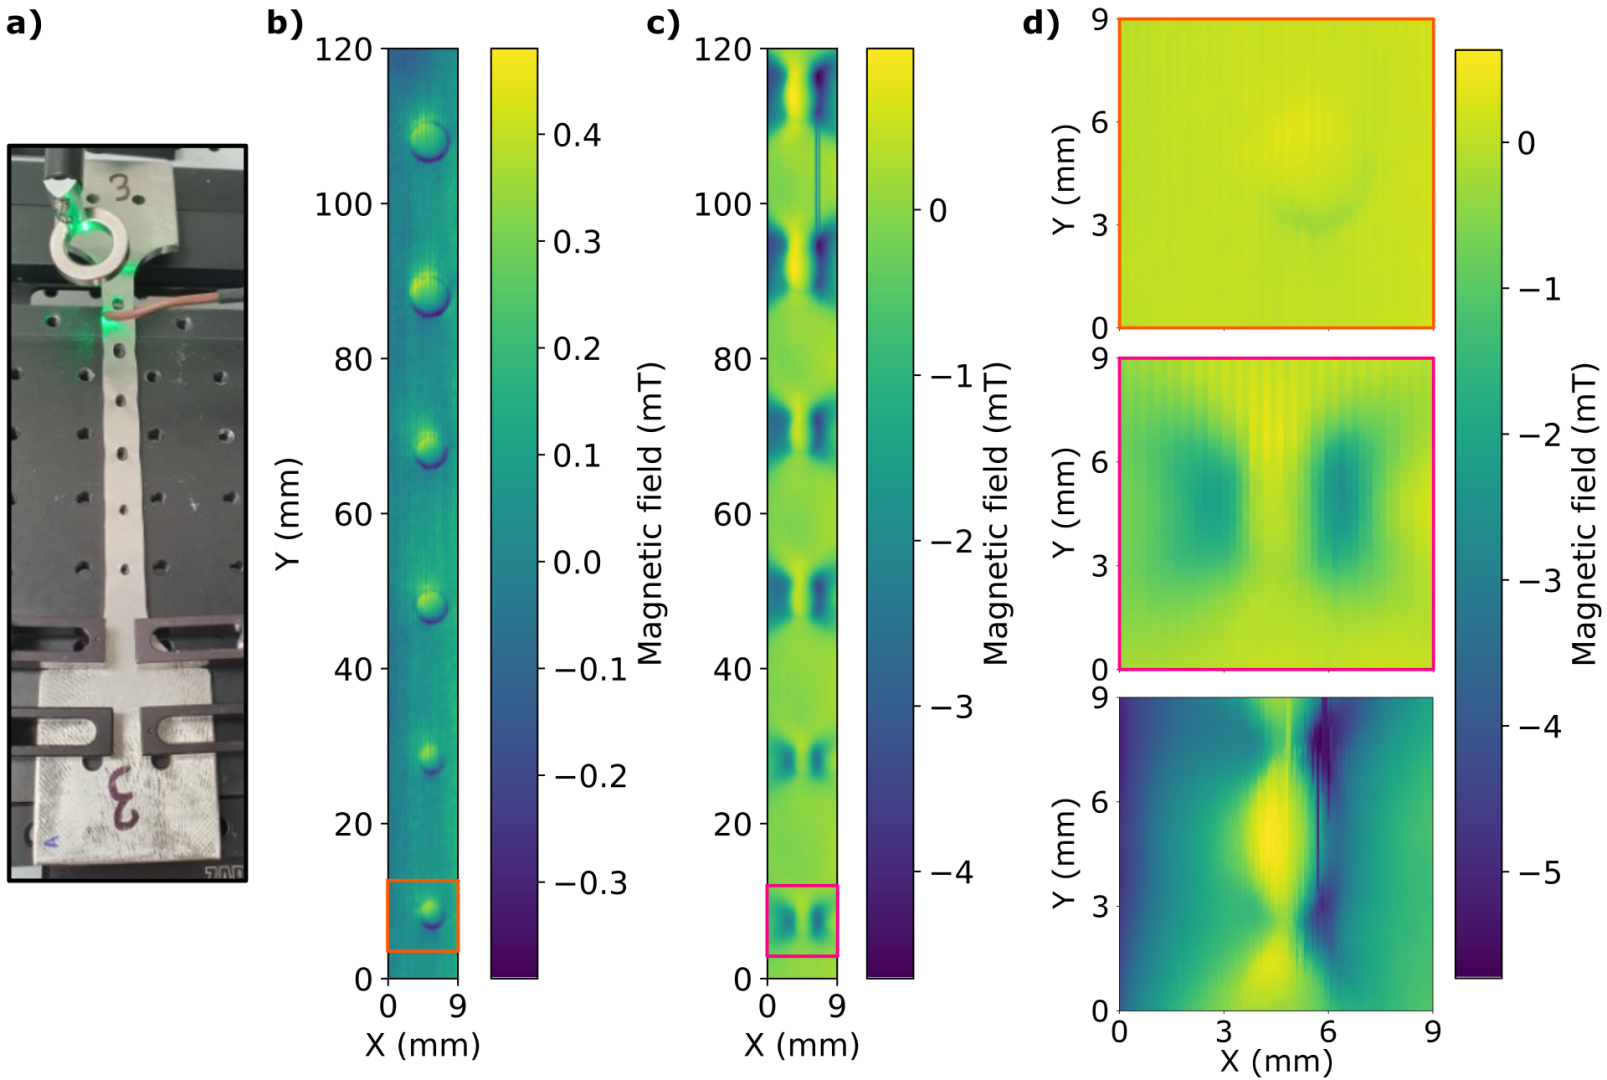
Figure 1 – a). Photograph of one of the test tubes subjected to mechanical traction of varying intensities. b)/c). Magnetic field distribution, projected along the NV crystallographic axis, and measured using NV magnetometry over the entire stretched area of the sample without tensile stress / with medium tensile stress. d). Stray magnetic field distribution, measured using NV magnetometry over the smallest diameter hole, for samples from top to bottom, without tensile stress, with moderate tensile stress and with tensile stress up to rupture. For the two maps above, the scan corresponds to the area framed in orange in Fig. 1a / in pink in Fig. 1b.
To reproduce the formation of martensite under tensile stress, the CETIM laboratories supplied us with stainless steel specimens shaped like dog-bones and drilled with holes of different diameters (Figure 1.a). In the highly stressed regions around the holes, a transformation from austenite to martensite is expected. Before applying mechanical deformation, we first mapped the magnetic field above the sample by scanning its surface with our diamond-based endoscope (Figure 1.b). A weak magnetic signal, on the order of a few hundred µT, was observed near the holes. After mechanical loading, the surface was scanned again (Figure 1.c). This time, a pronounced “butterfly-wing” magnetic pattern can be observed around the holes, with field strengths of several mT, and with a high spatial resolution of about 100 µm.
We then focused on the small diameter hole in three different specimens: one left unstretched, one subjected to moderate stretching, and one stretched until failure (Figure 1.d). The results show that the stronger the applied tension, the more intense the magnetic response becomes. In addition, the distribution of the magnetic field changes with the tensile load, offering valuable insights into how and where embrittlement propagates.

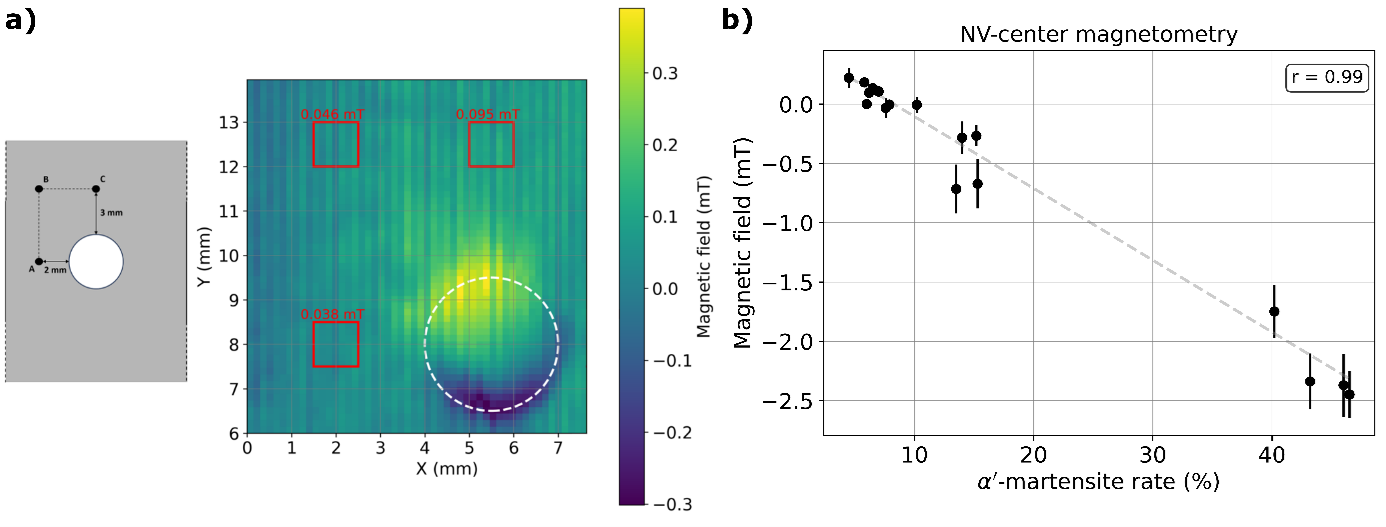
Figure 2 – a). Locations of the 1 mm² measurement points analyzed by X-ray diffraction XRD (right) and by NV magnetometry (left). b). Magnetic field measured by NV magnetometry as a function of martensite rate measured byl XRD. r in the textbox indicates the corresponding Pearson correlation coefficient. The error bars were obtained from the standard deviation of the NV measurements over areas of 1 mm².
The next step of this study is to connect the magnetic signature detected by NV magnetometry with the formation of martensite during deformation. To achieve this, X-ray diffraction (XRD) measurements were performed to confirm and quantify the presence of martensite. Since XRD characterization is very time-consuming (about one hour per measurement point of 1 mm²), we selected three representative areas around the holes for analysis (Figure 2.a). The NV magnetic field measurements were averaged over the same 1 mm² regions. The correlation analysis (Figure 2.b) shows an excellent linear relationship between the XRD and the NV results, with a correlation coefficient of r = 0.99. This remarkably high value demonstrates that NV-based detection of magnetic leakage fields is extremely sensitive to both the presence and the spatial distribution of ferromagnetic martensite, and thus of embrittlement of stainless steels.
Our NV-based NDT technology can therefore quantify the magnetic signature of martensite at the surface of stainless steel, non-destructively and with much faster acquisition times compared to XRD. Beyond this capability, NV centers offer high spatial resolution and sensitivity, with a robust small-size endoscopic probe, enabling access to complex geometries in harsh environments. These advantages make this approach highly promising for assessing embrittlement caused by martensite in stainless steel components. In the future, our NV-based NDT could be applied to early damage detection and

